WebSockets with AWS Elastic Beanstalk
One of my recent projects www.grequiz.com, makes use of WebSockets with the help of Socket.io. I used AWS Elastic Beanstalk to host my web application, and configuring it to work with WebSockets was nothing less than a feat.
In this post, I’ll show you how to setup your WebSockets application on AWS Elastic Beanstalk.
In Elastic Beanstalk, if you create a new Node.js environment, deploy your WebSockets application and open it, you will typically run into this WebSocket connection error in the console:

This is because Elastic Beanstalk uses Nginx as a proxy server. Nginx supports WebSockets, but we have to tell it to upgrade to WebSockets.
We can do this by modifying the Nginx configuration file using the .ebextensions mechanism for Elastic Beanstalk.
Create a new folder named .ebextensions in your application’s root directory. In that folder, create a new file with the following code snippet. I’m calling this new file WebSocketsUpgrade.conf. You can use any name, but it should have a .conf extension.
container_commands:
  enable_websockets:
    command: |
     sed -i '/\s*proxy_set_header\s*Connection/c \
              proxy_set_header Upgrade $http_upgrade;\
              proxy_set_header Connection "upgrade";\
      ' /tmp/deployment/config/#etc#nginx#conf.d#00_elastic_beanstalk_proxy.conf
So, this little code snippet, borrowed from AWS Documentation, modifies the Nginx configuration file, and Nginx now allows WebSocket connections.
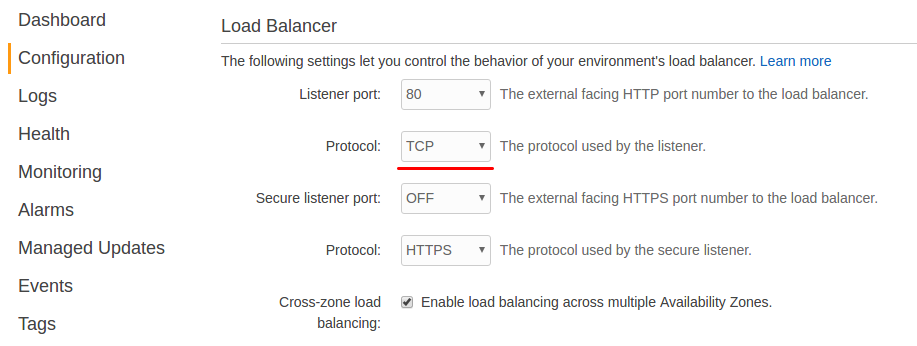
We are not yet done. We need to change the load balancer’s listener protocol from HTTP to TCP.
Click on the Configuration link in the sidebar. Then go to Load Balancing under Network Tier section and click the gear icon. Here, change the protocol of the load balancer’s listener to TCP.

Now you are all setup. Deploy your application, visit the URL of your app, and everything should be working as expected.
If you want to enable HTTPS for your WebSockets app, check out my post HTTPS for WebSockets App on AWS.